Avro 683 Lancaster (Memorial Lancaster - Auckland)
Background
The development of the Lancaster heavy bomber was one of those strange twists of fate. The engines designated for the twin engine Manchester medium bomber (based on Air Ministry requirement B13/36) were not reliable, and an aircraft was re-engined with four RR Merlin X engines. This modified airframe became the prototype Lancaster. A second prototype was constructed with Merlin XX engines, and the Lancaster became a reality - going into production in early 1942. And the rest as they say is history . . .
Not directly operated by the RNZAF, the Lancaster's connection with New Zealand is through 75 (NZ) SQN and the other squadrons of Bomber Command in which thousands of New Zealanders served with the RAF during WWII. 75 (NZ) SQN converted to Lancaster IIIs in April 1944 (having previously operated Wellingtons and Stirlings), and used these aircraft up until the end of the war in Europe, when they were converting to Lincolns.
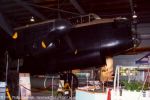
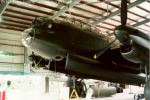
The aircraft illustrated below was built as a Lancaster VII. I understand this is one of only between ten and fifteen complete survivors worldwide (2 airworthy). Built by Austin Motors in 1945 as NX665, this aircraft did not see wartime service, but was later passed to the French (one of 54) to support the Western Union (the fledgling NATO). Somewhat modified, the aircraft operated from Morocco, Vietnam, and New Caledonia. Based in Noumea from the late 1950's as WU-13, it carried out air-sea rescue, surveillance flights, and other duties around the Pacific.
Donated to the people of New Zealand, it flew into Auckland in April, 1964. The aircraft is displayed at MoTaT where it has been steadily restored by members of the Bomber Command Association (NZ). The intention has been to closely recreate the appearance of a Lancaster Mark III of Bomber Command of circa September 1944, both inside and out (including the addition of appropriate radar, and a mid-upper turret). Today it is painted in camouflage and markings to commemorate New Zealand aircrew who served with the RAF - being currently displayed as PB457 SR-V of 101 SQN and ND752 AA-O of 75 SQN, both of which were lost on operations.
Restoration News: I paid another visit to MoTat on August 25, 1999. Details here.
Last Update:- 13 September, 1999
Special Feature: A Virtual Tour inside a Lancaster!
 |
I have visited MoTaT to photograph NX665 on a number of occassions, but on November 18th, 1996 I had the opportunity to go a little further and tour the interior of this aircraft. I had been wandering around the hangar display area when I saw what I thought was a visitor wander up to the rear door of the Lancaster and let himself in. When I asked the very helpful lady at the front desk about doing likewise, she informed me I would have to check with the 'visitor'. So I approached him about photographing the interior.
|
In one of life's happy coincidences I was visiting the aircraft section on the same day that Phil Furner, a member of the restoration crew was updating his archive of photographs of the restoration project. (This was a Monday, and the work crew is normally in on Wednesday). Initially he was reluctant - access is normally restricted to the restoration crew and BCA(NZ) members by arrangement. However, after some negotiation I managed to convince him that it would be a good idea to let me in (you'll have to find your own password), and so began one of the happier days I have experienced. I must admit that once over his initial reluctance, Phil proved an amiable, knowledgeable, and helpful host - and I would like to take the opportunity to thank him for his time and assistance!
|
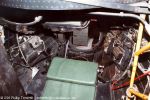
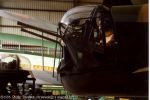
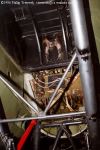
When I managed to stop my hands shaking (that adrenalin burst can be hard to contain), I followed Phil in the rear door. The aircraft was lit by a temporary cord of bulbs strung mainly along the port side. My first impression was that the interior is much smaller than you would expect - its a big aircraft, but it wasn't designed for comfort. I was dressed casually and only carrying a couple of cameras - but even so, moving around required care. I understand why the aircraft is not open to the general public! How a wartime aircrew, dressed in bulky flight gear got on, I can't imagine. The prospect of abandoning the aircraft must have been extremely difficult!
|

An interior view without the flash - its quite dark!
|
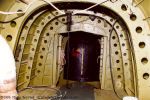 |
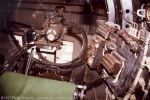
Looking aft there was complete darkness - except for the light coming through the two small windows in the doors leading to the rear turret. It really is a long way back there, and I got an inkling of what some of the first hand reports of the loneliness of the tail gunner really meant. The turret contains two 0.5's, which I'm told were not uncommon in 1 Group in late 1944.
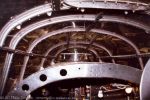
Looking aft - the flash makes a big difference. |
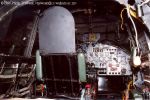
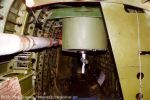
Looking forward, the bottom of the newly installed mid-upper turret could be seen. Phil explained that the intention of the restoration is to present NX665 as a MK III of circa September 1944 - reflecting the type of machine operated by the majority of Kiwi aircrew in Bomber Command. This work is not yet complete, but I could get a feel for the final shape. As a Lancaster VII, provision was made during manufacture for the aircraft to be equipped with a Martin 0.5 all electric mid-upper turret (never fitted). This was to be sited two metres forward of the position of the Frazer Nash turret generally used. Restoration of a correct FN50 turret has been made using the original Avro plans , with the work overseen by an Air New Zealand structural engineer. The turret is now in place, but requires finishing work. |
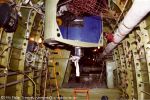
View looking forward - there's a lot of tubing and wiring.
Note the tie-downs on the right.
|
 |
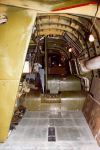 |
Brushing past the turret, we moved forward. There is room to stand, but you have to watch your head. I'm only 1.72m tall (just under 5'8) - I don't know how taller folk would find getting around. Along the starboard side is a heating pipe running back to the mid-upper and rear turret - apparently somewhat of a token gesture from the designers, as this was reportedly not too successful.
Portrait views looking forward - note the reducing headroom. |
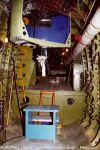
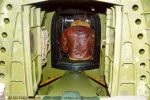
Moving forward, up the first step toward the center section of the aircraft. The area adjoining the former casualty bed is currently a storeroom for restoration materials, keeping various pieces of equipment away from prying fingers, as the aircraft being on display is not like being in a workshop.
Another view looking forward - note the spar sections at 'floor' level. |
 |
 |
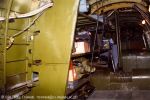
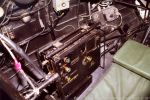
Climbing over the spar sections wasn't to easy - especially when your trying to avoid touching anything else. Phil removed the sacking which is normally on the forward spar to protect items from passing traffic so I could photograph the nitrogen bottles (visible on the right). At this point the wireless operators position and cockpit are coming into view. Note the colour change from zinc chromate to black as we enter the 'crew' area. |
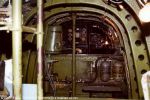
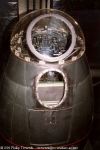
A few squadrons (such as 101SQN for whom one side of this aircraft is marked) carried extra radio gear with which a German speaking crew member tried to confuse Luftwaffe night fighters. Above the radio position is the astrodome. The dome on the Mk VII was higher than that on a MK III. The dome has been modified, but the restoration crew are looking at replacing the current fitting. The WOP/AG radio/radar gear is now correct for the period, and the Navigator's Gee and H2S is virtually complete.
Right: Wireless Operator's position.
Far Right: Looking forward from the Navigator's position. |
 |
|
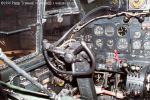
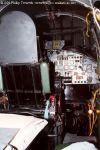
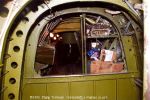
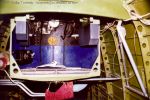
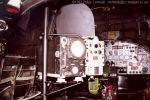
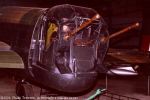
Moving forward from the radio position, one reaches the 'office'. To the left is the navigators table. Forward and on the left (of course) is the pilots position. The seat sits noticeably 'high' in relation to the glazing. I was struck by how good the view from the cockpit is - all that perspex has a role to play, although I imagine it left the aircrew in that area feeling somewhat exposed. The armour plating on the back of the seat may have provided a small measure of comfort. Phil pointed out that all the perspex in the aircraft has been replaced courtesy of a local moulder, giving an as new look to the glazing. |
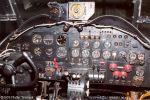
Unfortunately I wasn't thinking too straight by this point (excitement will do that to me) - and I completely forgot to take some external photos from the cockpit. I did notice how far the glazing ran back in relation to the fuselage - the skin reaches forward to the navigators postion, but the glazing reaches back to the astrodome above the wireless position. Phil patiently waited for me to mess around getting several photos of the control panel and fittings - he also kindly removed the control locks and pulled back the yoke for a better view of the instruments. |
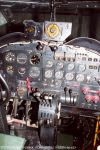 |
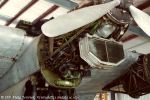
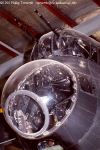
To the right of the throttle quadrant can be seen the access to the nose. I didn't go forward as the area was taped up for painting - it also looked a bit of a squeeze to get into. I'm not sure, but I assume access to the nose turret is in there somewhere. I'm told that the nose area is nearly complete - including a working Mk.14 bombsight and its associated analogue computer. After chatting about the aircraft for a while, (and Phil knows a lot) we started to move back toward the rear of the aircraft.
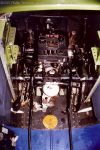
Left: Control Panel.
Right: Bomb Aimer's Position. |
 |
| Returning past the Navigator's position, this photo gives a much better view of the area. The frame visible is the point at which the aircraft top surface is skinned over, under the glazing. The Navigator's table is to the right, and the forward spar is under the burlap sack visible in the middle distance. The wireless operator's position is beyond the panel on the right. |

|

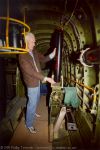
My guide - Phil Furner.
|
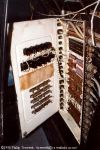
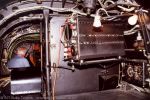
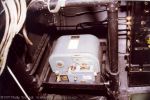
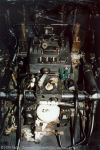
The amount of wiring in the aircraft is amazing, and when I commented on this, Phil opened up the fuse box - this could drive an electrician crazy. The restoration team can be thankful they don't have to rewire. The fuse box is opposite the wireless operator (visible as the panel next to the photograph of Phil). Note the original spare fuses sitting in the rack on the panel door. |
|
As we moved back, the spar wasn't any easier to negotiate a second time. Again note the colour change from black to zinc chromate as we leave the 'crew' area. The walk back mostly gave an opportunity to view the various positions from the 'other direction - but it also reinforced just how long the aircraft is.
Looking aft from the Wireless Operator's position. |
|
Looking aft to the mid-upper turret.
|
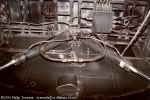
The photo looking back past the mid-upper turret illustrates this, as the frames and ducting recede into the distance. Beside the rear door was something I hadn't seen while moving forward: the Distant Reading Compass (DRC) is in working order, mounted in its cage (a nice photo for the modellers).
|

Gyro-compass & cage.
|
 |
Then it was time to leave the aircraft ...
... and so ended my tour. It seemed quick, but thinking back Phil must have spent 45 minutes showing me round 'his plane'. It is clear that it is very important to him. So, once again I take the opportunity to thank Phil Furner for the opportunity to explore this great old aircraft, and for his time in acting as guide. Phil is an Associate Member of the RAF Bomber Command Association (NZ) - his father is an RAF Bomber Command veteran. Phil has visited (and apparently toured) all the complete Lancaster survivors. I hope that I may be as fortunate.
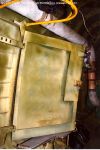
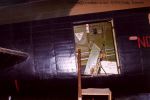
Left: the exit (the crew door is partially closed).
|
My Second Tour inside Lancaster NX665!
On December 10th, 1997 I arranged to meet again with Phil Furner at MoTaT. He organised tours for me of several aircraft, and then allowed me the opportunity to see the changes which had been made over the previous twelve months inside NX665. Some of these have been described above (see Restoration News), but this section allows me to shows them.
I arrived early, but the restoration team was already in action. A large number of people were around and on the aircraft. (I was worried about the chap dusting down the top of the fuselage with a mop - its a long drop to the floor). I met Phil, and he pointed out some of the activities - like the group constructing rest bunks from the plans Phil recently acquired in Britain. Phil then introduced me to some of the other teams (particularly the Solent and the Sunderland) who took me off for a tour. Just before lunch, I returned for a look at the Lancaster.
|
|
When I entered the aircraft, Phil was busily occupied loading the guns in the mid-upper. The belts have been loaded with cartridges lacking gunpowder. As he worked I had a chance to chat with his father, who had been a gunner. He gave me some very interesting comparisons between Lancasters and Halifaxes. When Phil was done, I was able to get the images shown here.
Left: Looking aft, at the now completed mid-upper turret
Right: Looking up into the turret
|
|
We then moved forward, and I had a chance to see some of the new (well restored /rebuilt) equipment which has been installed. At left can be seen the Gee set, installed at the left of the navigators table. At right can be seen the H2s set. I got quite a surprise as my flash went off, as I hadn't anticipated the screen would fluoresce! This is installed to the right of the navigators table, behind the pilot's seat.
An interesting point, as John Barton pointed out to me a discussion later - due to the location of the H2s set, post-1944 Lancasters do not have a bubble in the perspex on the port side, as you can't reach that spot to look down or aft. |
Navigator's position : Gee set
Navigator's position : H2s set.
|
|
Having checked out the 'office', this time around, I got a chance to go right forward and have a look at the bomb-aimers compartment. There is some stunning stuff here. After climbing down past the control panel - not easy as its a tight fit, the compartment is quite roomy. That's probably because the seat is on the floor, and the nose turret seat was stowed. To the rear on the port side is the F.24 camera (as shown below). Moving forward (same side) is the bomb-aiming computer in its rack. This is an amazing piece of equipment, and what's more, this one is in working order. The restoration team were able to locate someone who had worked on these during the war, and it has been fully restored! Then in the middle of the perspex bubble is the bomb-sight itself.
|
F.24 Camera
|
Bomb-Aiming Computer
|
Bomb-Sight
|
|
I spent quite a while just looking at all the intricacies of the equipment - this area of the aircraft has noticably more wiring and other 'bits & pieces'. Its also hard to follow where they go with the constant black colouring, buts its definitely fascinating none-the-less.
|
|
Left : Cockpit view - Looking Aft
As I climbed back up into the cockpit, I remembered to get a photo looking down the length of the aircraft (at right). Again I was struck by how far aft the glazing extends - right to the astrodome in fact, above the wireless operator's position. Visibility from the cockpit is very good - but I can understand why the crew in the 'office' felt exposed! Again I forgot to get a photo of me inside the aircraft (Doh!). Then it was time to move on, as the restoration team were packing up for the day. After my second visit I found I was just as awestruck by this beautiful aircraft, and really buzzing on an adrenalin high.
|
|
Once again I came away with a respect for the individuals who flew these aircraft in wartime conditions, and for the men who are making this aircraft a fitting memorial. My thanks go to Phil for arranging to let me inside the Lancaster!
|
One of the highlights of my visit was the chance to meet John Barton with who I have talked and corresponded. I wish to thank him for his feedback (and extra details) regarding this page. John is the Vice-President of the Bomber Command Association (NZ). As I noted above - these folks are heavily involved in restoring and maintaining NX665, under the auspices of MoTaT.
Much support is necessary for the restorers to continue their work on this aircraft, so if you can help (especially you Kiwis...), please do so. I was asked to put out a request, and am glad to do so. The team is looking for a couple of Mae Wests (WWII vintage) and some 'observer' type parachute harnesses. If you can oblige, or know the whereabouts of these items, the team would be glad to hear from you!
(Contact MoTaT,
805 Gt. North Rd,
Western Springs,
Auckland, NZ
or Phone (64)(9)8460-199).
If you are interested in more information on this aircraft: a leaflet, and a 48pp book - with lots of photographs are available from the above address. (NZ$8.50 is the last price I have)
More MoTaT aircraft can be viewed here .
Latest Restoration News
My latest visit to the Lancaster was on August 25, 1999. At that time I spoke to John Barton, and he showed me some of the latest additions to the aircraft.
The first thing I noticed was the safety line rigged up above the aircraft. Regular access to the topsides are required at present as a survey is being made of rivets for replacement. Seeing men up on the wing reinforces how big the aircraft is - and how far down it is from that wing!
|
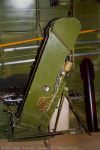
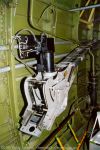
John took me to the rear of the aircraft, and we went in the main crew door on the starboard side. Just inside the door was an obvious addition - a flare chute. The picture to the right shows the chute as seen from the door (that is looking toward the port side. The picture to the left shows John holding a replica photo-flash above the chute. This gives a nice bit of scale to this part of the aircraft. As I have commented previously, the fuselage is very narrow. It was also nice to finally get a photo of John. Note the Distant Reading Compass in its cage partially obscuring him.
Left and Right: Flare Chute
|
|
|
The photo to the right shows another replica flare in its mount on the port side of the aircraft. As can be seen, it is strapped into place. This flare can also be seen in the picture above on the fuselage wall opposite John Barton.
Right: Replica Flare in mounting
|
|
Left: Ammunition tracks
with drive motor -
port side.
|
The next item that John pointed out was the ammunition tracks that feed from boxes near the centre section back along both sides of the fuselage to the rear turret. The restoration team only had one original box. Another has been manufactured to this pattern, and I couldn't say which was which. Sections of the tracks were also missing and a lot of work has gone into manufacturing new replacements. The workmanship is high, and its amazing the skills the team has to draw on. The pictures to the left and right show the ammunition tracks. The picture to the left shows a drive motor above the track - which at the moment is still incomplete. The picture to the right shows the track on the starboard side leading up over some more replica flares and into the ammunition box. This is the original. When full, this would have taken two men to lift - hence its placement near the aircraft's centre of gravity.
|
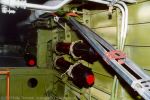
Right: Ammunition tracks -
starboard side looking
forward.
|
|
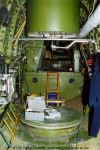
The picture to the left is a general view looking forward past the underside of the mid-upper turret. This can be compared with my earlier photos to show how much the work has progressed - and how much more cluttered the interior is becoming as more equipment is installed. The tool box clearly says Œmen at work¹. The picture to the right is another view up into the mid-upper turret.
Left: Looking forward past the Mid-Upper turret
Right: Mid-Upper turret controls.
|
|
We did not go any further forward on this occassion. As reported previously, the cabling for video cameras had been installed. The cables and cameras are now rigged up to monitors outside. This allows the public a chance to see six of the crew stations, albeit remotely. Its a bit different to just seeing a photograph. Its also provides a chance to see the restoration crew in action. The cameras and monitors were funded in 1997 by a grant from the Chis Whitney Trust. I think I was lucky to have obtained my interior photos when I did. John tells me that further work in the forward section includes the restbunk (previously described) which now just require upholstery, and the installation of some more items which have become available for the H2S.
|
Moving out I got another picture looking aft - there's a suspicious looking mannequin sitting in the rear turret. This photo compares with one I took sometime ago - which is further up this page in the tour section. Note the parachute harness on the left (starboard side).
Left: Looking aft into the rear turret.
|
|
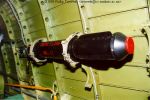
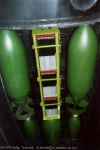
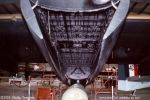
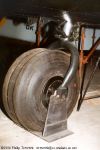
Outside I also got to see some additions. In the bomb bay, a number of replica munitions have been loaded. An SBC (small bomb container) sits between 1000lb bombs, with 500 pounders behind. The bombs are all replicas, and are used to give an idea of a typical bombload. The replicas are used both because originals are not available, and because they are lighter and therefore place less strain on the airframe. Painted in the original markings they look real enough. The SBC is aluminium, while the 50 incendiaries it contains are made of wood. The 500 and 1000lb bombs are made of fibreglass.
Right: The new additions to the bomb bay
-looking aft.
|
|
|
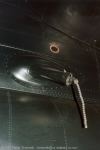
Everytime I look at the aircraft I see something new. All that black paint doesn't help. On this visit I noticed the trailing antenna mount, just below the leading edge on the port side. I have not photographed it before, but figured it would be of interest. The 'bobbles' are lead weights on the end of the antenna wire. Note the red stencil above the mount - this is the CoG marker for the aircraft.
Left: The trailing aerial on the port side.
|
Lastly I must report that the restoration project received second place in the FAI (Federation Aeronautique Internationale) 'Phoenix Group' Diploma Award for 1999. First place in this prestigious award was taken out by the Royal Aero Club of Spain for the restoration of a 1932 Cierva Autogyro to flying condition. However, the second placing indicates the level of work going on at MoTaT. I thought it was interesting that I didn't find out about this from the team themselves - they're happy to talk about the plane, but they won't talk about themselves or their achievements. I really don't think these guys are very good at self publicity - its just as well I'm here to help!
|
Technical Data
Data is for Lancaster III
- Crew : 7
- Dimensions
- Span : 31.1m (102'0ft)
- Length : 29.1m (69'4ft)
- Height : 6.1m (20'0ft)
- Weight
- empty : 16750kg (37000lb)
- max : 30800kg (68000lb)
- Power Plant : 4x 1280hp RR Merlin 28
- Performance :
- max speed : 440km/h (275mph)
- max climb : ft/min (m/min)
- ceiling : 25000ft (7650m)
- range : 4800km (3000miles)
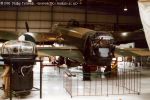
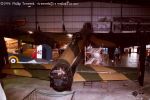
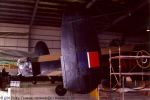
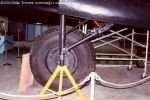
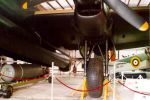
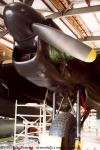
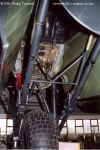
Images - Close Up
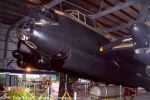
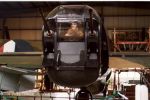
Since the area in which this aircraft is displayed is somewhat crowded, it is difficult to get a single picture of the 'whole' aircraft. This being the case, I think all these pictures fit into the 'close-up' category. (Remember to let me know if you have a request for an image of a particular part of the aircraft!).
 © 1996-99 Phillip Treweek, all rights reserved